|
home
software photography gallery 35mm medium format large format darkroom about contact |
Large format equipmentLarge format used to be out of my reach, mainly due to the costs of the equipment and due to the space requirements for a large format enlarger. During a postdoctoral fellowship in the US I had easy access to used large format equipment and enough space to run a large format darkroom. BodyI got myself a used Walker Titan SF 4x5in field camera. I've spent quite some time reading reviews of various field cameras on the web, but this one turned out to be most suitable for what I had in mind. I love to hike and climb the mountains, and I needed a body which is sturdy enough to withstand the occasional hard contacts with the ground as well as bad weather. The Walker isn't the lightest 4x5 but quite likely the most sturdy one.
The Walker Titan SF offers all movements except front cross and back rise/fall. The front offers both axis tilt and base tilt though. All movements are very easily aligned to their zero positions by "feel". The camera is set up and aligned in no time. My only complaints in terms of handling are the front swing where some screw heads tend to lock the locks again while you try to move the standard, and the back cross where the tommy bars tend to get out of reach while they're unlocked. LensesMy limited budget allowed for two lenses only. I use a Fujinon W 5.6/150mm lens mounted in a Copal 0 shutter as a standard lens. This lens is hard to come by as it is mainly sold in Japan, but all tests show that it is up to par with the corresponding Schneider and Nikon lenses, and the price for my preowned, but never used lens was hard to beat. I also got myself a Schneider 9.0/305mm G-Claron mounted in a Copal 1 shutter. This preowned lens was offered by B&H in New York at a very reasonable price. While this is advertized as a process lens (and I actually use it on my enlarger as well), it does a great job in landscape photography if you stop down to 22 or below. The coverage is tremendous and would be sufficient for an 8x10. Other stuffI've purchased the remaining stuff with one thing in mind: I'll have to haul this stuff up and down dozens of mountains each year. Everything should be as lightweight as possible and fit into a reasonable backpack. The main thing of course is to skip unnecessary gadgets. Cut it down to the bare essentials. It was not easy to find a dark cloth that lives up to its name. Most cloths are too thin, too slippery, and not dark at all. I finally decided to take my wife and a serious Mag-lite to a local fabric store and check a few fabrics for their ability to keep out light. We finally settled on a double layer of black velveteen and a white cotton cover for the outside. The velveteen is good enough to keep the Texas sun out and does not slip as easily as most commercial dark cloths. Besides, due to its thickness my dark cloth doubles as a protective wrapper for the camera body while it is in the backpack. I carry a Manfrotto CarbonOne #441 tripod with a #168 ball head on my trips. As the name implies, this is one of these weight-saving carbon-fiber tripods. These have the added benefit that they are not cold to the touch when you use them on winter trips. The ball head is less convenient than a 3D head, but a lot more compact. It also offers a separately locked horizontal rotation. I use a cross check level (Johnson level & tool No. 125) that carries two perpendicular vials to align the camera body and the back (this is an approx $3.00 item available at hardware stores).
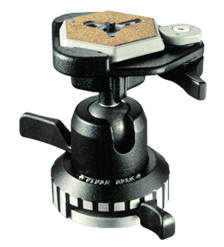
The left image shows the Manfrotto #441 tripod without a head. I use the ball head depicted right next to it. The cross check level shown above is roughly 6cm long and weighs next to nothing. I put it on the base of the camera to level it out in both axes. It is also possible to hold the level to the focusing screen or to the lens board in order to align the back and front standards, respectively. I check the exposure with a Capital spotmeter which I found to be a reliable and cheap instrument. The films go into Riteway 4x5in film holders. I use a basic set of B/W gelatine filters in a Lee holder that snaps onto any sort of lens, including the spotmeter, by means of a rubber band.
The left image shows the spotmeter. If you peek through it and press a button, you'll have to read a number from the scale and transfer it to the exposure calculator on the left side of the instrument. This sounds awkward in the digital age but it works very well. The image on the right hand side shows the snap-on filter holder. I've attached two loops to the rubber band to make it easier to get hold of it. Otherwise it is quite cumbersome to attach the holder to a large format lens mounted on the camera. All this stuff goes into a REI Talus backpack which easily holds the complete large format gear, plus protective clothing as well as food and water for a day of hiking. |